2024.07.20 - [Spring/대용량 트래픽] - Spring Webflux와 Redis이용해서 접속자 대기열 시스템 만들기(1)
Spring Webflux와 Redis이용해서 접속자 대기열 시스템 만들기(1)
2024.07.13 - [Spring/대용량 트래픽] - Blockhound로 디버깅하기 Blockhound로 디버깅하기2024.07.13 - [Spring/대용량 트래픽] - Spring MVC vs Webflux 성능 비교(with Jmeter) Spring MVC vs Webflux 성능 비교(with Jmeter)2024.07.12
lsdiary.tistory.com
wait -> proceed 으로 렌더링이 리다이렉트되는걸 자동화 시키기 위해선 어떻게 해야할까?
Scheduler
EnableScheduling (Spring Framework 6.1.11 API)
Enables Spring's scheduled task execution capability, similar to functionality found in Spring's XML namespace. To be used on @Configuration classes as follows: @Configuration @EnableScheduling public class AppConfig { // various @Bean definitions } This e
docs.spring.io
스프링 공식문서에 있는 스케쥴링 사용방법이다.
- @EnableScheduling : SpringBootApplication 파일에 설정
- .yml
spring:
  task:
    scheduling:
      thread-name-prefix: "name"
      pool:
        size: 2
위 두가지 설정으로 간단하게 사용할수 있다.
다음으로 사용하기 위해 서비스단에서 메서드를 만들어준다.
- @Scheduled : 특정 주기로 해당 메서드를 실행 시켜준다.
- cron
- fixedDelay
- fixedLate
- initialDelay : 서버시작후 특정 시간이후에 실행
스케쥴링 테스트
@Scheduled(initialDelay = 5000, fixedDelay = 3000)
public void scheduleAllowUser(){
    log.info("Scheduled allow user queue");
}
의도한대로 잘 작동한다.
UserQueueService.java
@Scheduled(initialDelay = 5000, fixedDelay = 3000)
public void scheduleAllowUser(){
    log.info("Scheduled allow user queue");
    Long maxAllowUserCount = 3L;

    reactiveRedisTemplate.scan(ScanOptions.scanOptions()
            .match(USER_QUEUE_WAIT_KEY_FOR_SCAN)
            .count(100)
            .build())
            .map(key -> key.split(":")[2])
            .flatMap(queue -> allowUser(queue, maxAllowUserCount).map(allowed -> Tuples.of(queue, allowed)))
            .doOnNext(tuple -> log.info("Tried %d and allowed %d members of %s queue".formatted(maxAllowUserCount, tuple.getT2(), tuple.getT1())))
            .subscribe();
}
테스트 코드
테스트 코드에서는 각각의 테스트의 영향을 줄 수 있기 때문에 스케쥴러가 동작을 하지 못하게 해야한다.
application.yml
server:
  port: 9010

spring:
  data:
    redis:
      host: 127.0.0.1
      port: 6379
scheduler:
  enabled: true
---
spring:
  config:
    activate:
      on-profile: test
  data:
    redis:
      host: 127.0.0.1
      port: 63790
scheduler:
  enabled: false
UserQueueService.java
@Value("${scheduler.enabled}")
private Boolean scheduling = false;
    @Scheduled(initialDelay = 5000, fixedDelay = 3000)
    public void scheduleAllowUser(){
        if(!scheduling){
            log.info("passed scheduling");
            return;
        }
이제 등록된 모든 waiting queue에 대해서 스케줄작업을 해주는것이 필요하다.
UserQueueService.java
    private final String USER_QUEUE_WAIT_KEY_FOR_SCAN = "users:queue:*:wait";
    @Scheduled(initialDelay = 5000, fixedDelay = 3000)
    public void scheduleAllowUser(){
        if(!scheduling){
            log.info("passed scheduling");
            return;
        }
        log.info("Scheduled allow user queue");
        Long maxAllowUserCount = 3L;

        reactiveRedisTemplate.
                scan(ScanOptions.scanOptions()
                .match(USER_QUEUE_WAIT_KEY_FOR_SCAN)
                .count(100)
                .build())
                .map(key -> key.split(":")[2])
                .flatMap(queue -> allowUser(queue, maxAllowUserCount).map(allowed -> Tuples.of(queue, allowed)))
                .doOnNext(tuple -> log.info("Tried %d and allowed %d members of %s queue".formatted(maxAllowUserCount, tuple.getT2(), tuple.getT1())))
                .subscribe();
    }
- scan() 메서드로 모든 waiting queue의 키값과 일치하는 100개의 queue에 있는 사용자들을 3명씩 스케쥴링 시켜준다.

스케쥴러를 통해 proceed queue로 넘어가는과정을 자동화시켜봤다. 그렇다면 자동으로 웹페이지가 변환이 되는 시점에 검증로직을 추가하면 더 좋지 않을까? -> 프론트엔드 웹페이지로 타겟페이지로 이동하는 시점에 쿠키에 검증 데이터를 넣어준다.(쿠키에 데이터가 없거나 기대하는 값이 없다면, 처음부터 대기)
- 암호화 알고리즘을 이용하는것이 좋지만 간단하게 하기 위해 secure hash방법을 사용한다.
UserQueueService.java
    public Mono<String> generateToken(final String queue, final Long userId) {
        // sha256 값 생성
        MessageDigest digest = null;
        try {
            digest = MessageDigest.getInstance("SHA-256");
            var input = "user-queue-%s-%d".formatted(queue, userId);
            byte[] encodedHash = digest.digest(input.getBytes(StandardCharsets.UTF_8));
            // byte 데이터를 그대로 쓸 수 없기 때문에 HEX String 으로 변환
            StringBuilder hexString = new StringBuilder();
            for(byte b : encodedHash) {
                hexString.append(String.format("%02x", b));
            }
            return Mono.just(hexString.toString());
        } catch (NoSuchAlgorithmException e) {
            throw new RuntimeException(e);
        }
    }
만든 토큰을 프론트엔드에 전달하는 API
UserQueueController.java
@GetMapping("/touch")
Mono<?> touch(@RequestParam(name = "queue", defaultValue = "default") String queue,
              @RequestParam(name = "user_id") Long userId,
              ServerWebExchange exchange) {
    return Mono.defer(() -> userQueueService.generateToken(queue, userId))
            .map(token -> {
                exchange.getResponse().addCookie(
                        ResponseCookie
                                .from("user-queue-%s-token".formatted(queue), token)
                                .maxAge(Duration.ofSeconds(300))
                                .path("/")
                                .build()
                );
                return token;
            });
}
ServerWebExchange란?
- Spring Webflux에서 사용되는 비동기적이고 논블로킹 방식으로 서버 요청을 처리하는 인터페이스이다.
- WebFlux 구성 요소 간의 상호작용을 관리한다.
- 쉽게 말해, 원래 MVC 프레임워크에서 사용하는 HttpServletRequest, HttpServletResponse와 같이 HTTP통신을 하기 위한 도구이다.
응답 쿠키를 받을 수정된 HTML 파일
function fetchWaitingRank() {
    const queue = '[[${queue}]]';
    const userId = '[[${userId}]]';
    const queryParam = new URLSearchParams({queue: queue, user_id: userId});
    fetch('/api/v1/queue/rank?' + queryParam)
        .then(response => response.json())
        .then(data => {
            if(data.rank < 0) {
                fetch('/api/v1/queue/touch?' + queryParam)
                    .then(response => {
                        document.querySelector('#number').innerHTML = 0;
                        document.querySelector('#updated').innerHTML = new Date();
                        const newUrl = window.location.origin + window.location.pathname + window.location.search;
                        window.location.href = newUrl;
                    })
                    .catch(error => console.error(error));
                return;
            }
            document.querySelector('#number').innerHTML = data.rank;
            document.querySelector('#updated').innerHTML = new Date();
        })
        .catch(error => console.error(error));
}
rank가 0이하 -> proceed queue에 진입가능(타겟 웹페이지 진입가능)
진입 이전에 검증을 할수 있도록 url을 "api/v1/queue/touch"로 설정
토큰 검증 로직
- 이전까지는 proceed-queue 에서 rank값이 있는지 확인하고 진입여부를 확인했다면 이제는 쿠키에 담긴 토큰값으로 진입여부를 확인해야한다.
컨트롤러에서 사용할 서비스단 메드
// 토큰 검증 로직 추가
public Mono<Boolean> isAllowedByToken(final String queue, final Long userId, final String token){
    return this.generateToken(queue, userId)
            .filter(gen -> gen.equalsIgnoreCase(token))
            .map(i -> true)
            .defaultIfEmpty(false);
}
- 단순히 사용자의 토큰값과 요청 token이 같은지 판별한다.
테스트코드
@Test
void isAllowedByToken() {
    StepVerifier.create(userQueueService.isAllowedByToken("default", 100L, "d333a5d4eb24f3f5cdd767d79b8c01aad3cd73d3537c70dec430455d37afe4b8"))
            .expectNext(true)
            .verifyComplete();
}

@Test
void generateToken() {
    StepVerifier.create(userQueueService.generateToken("default", 100L))
            .expectNext("d333a5d4eb24f3f5cdd767d79b8c01aad3cd73d3537c70dec430455d37afe4b8")
            .verifyComplete();
}
- 처음에는 토큰값을 모르기때문에 아무값이나 넣고 테스트를 돌리면 콘솔에 올바른 토큰값이 나온다.
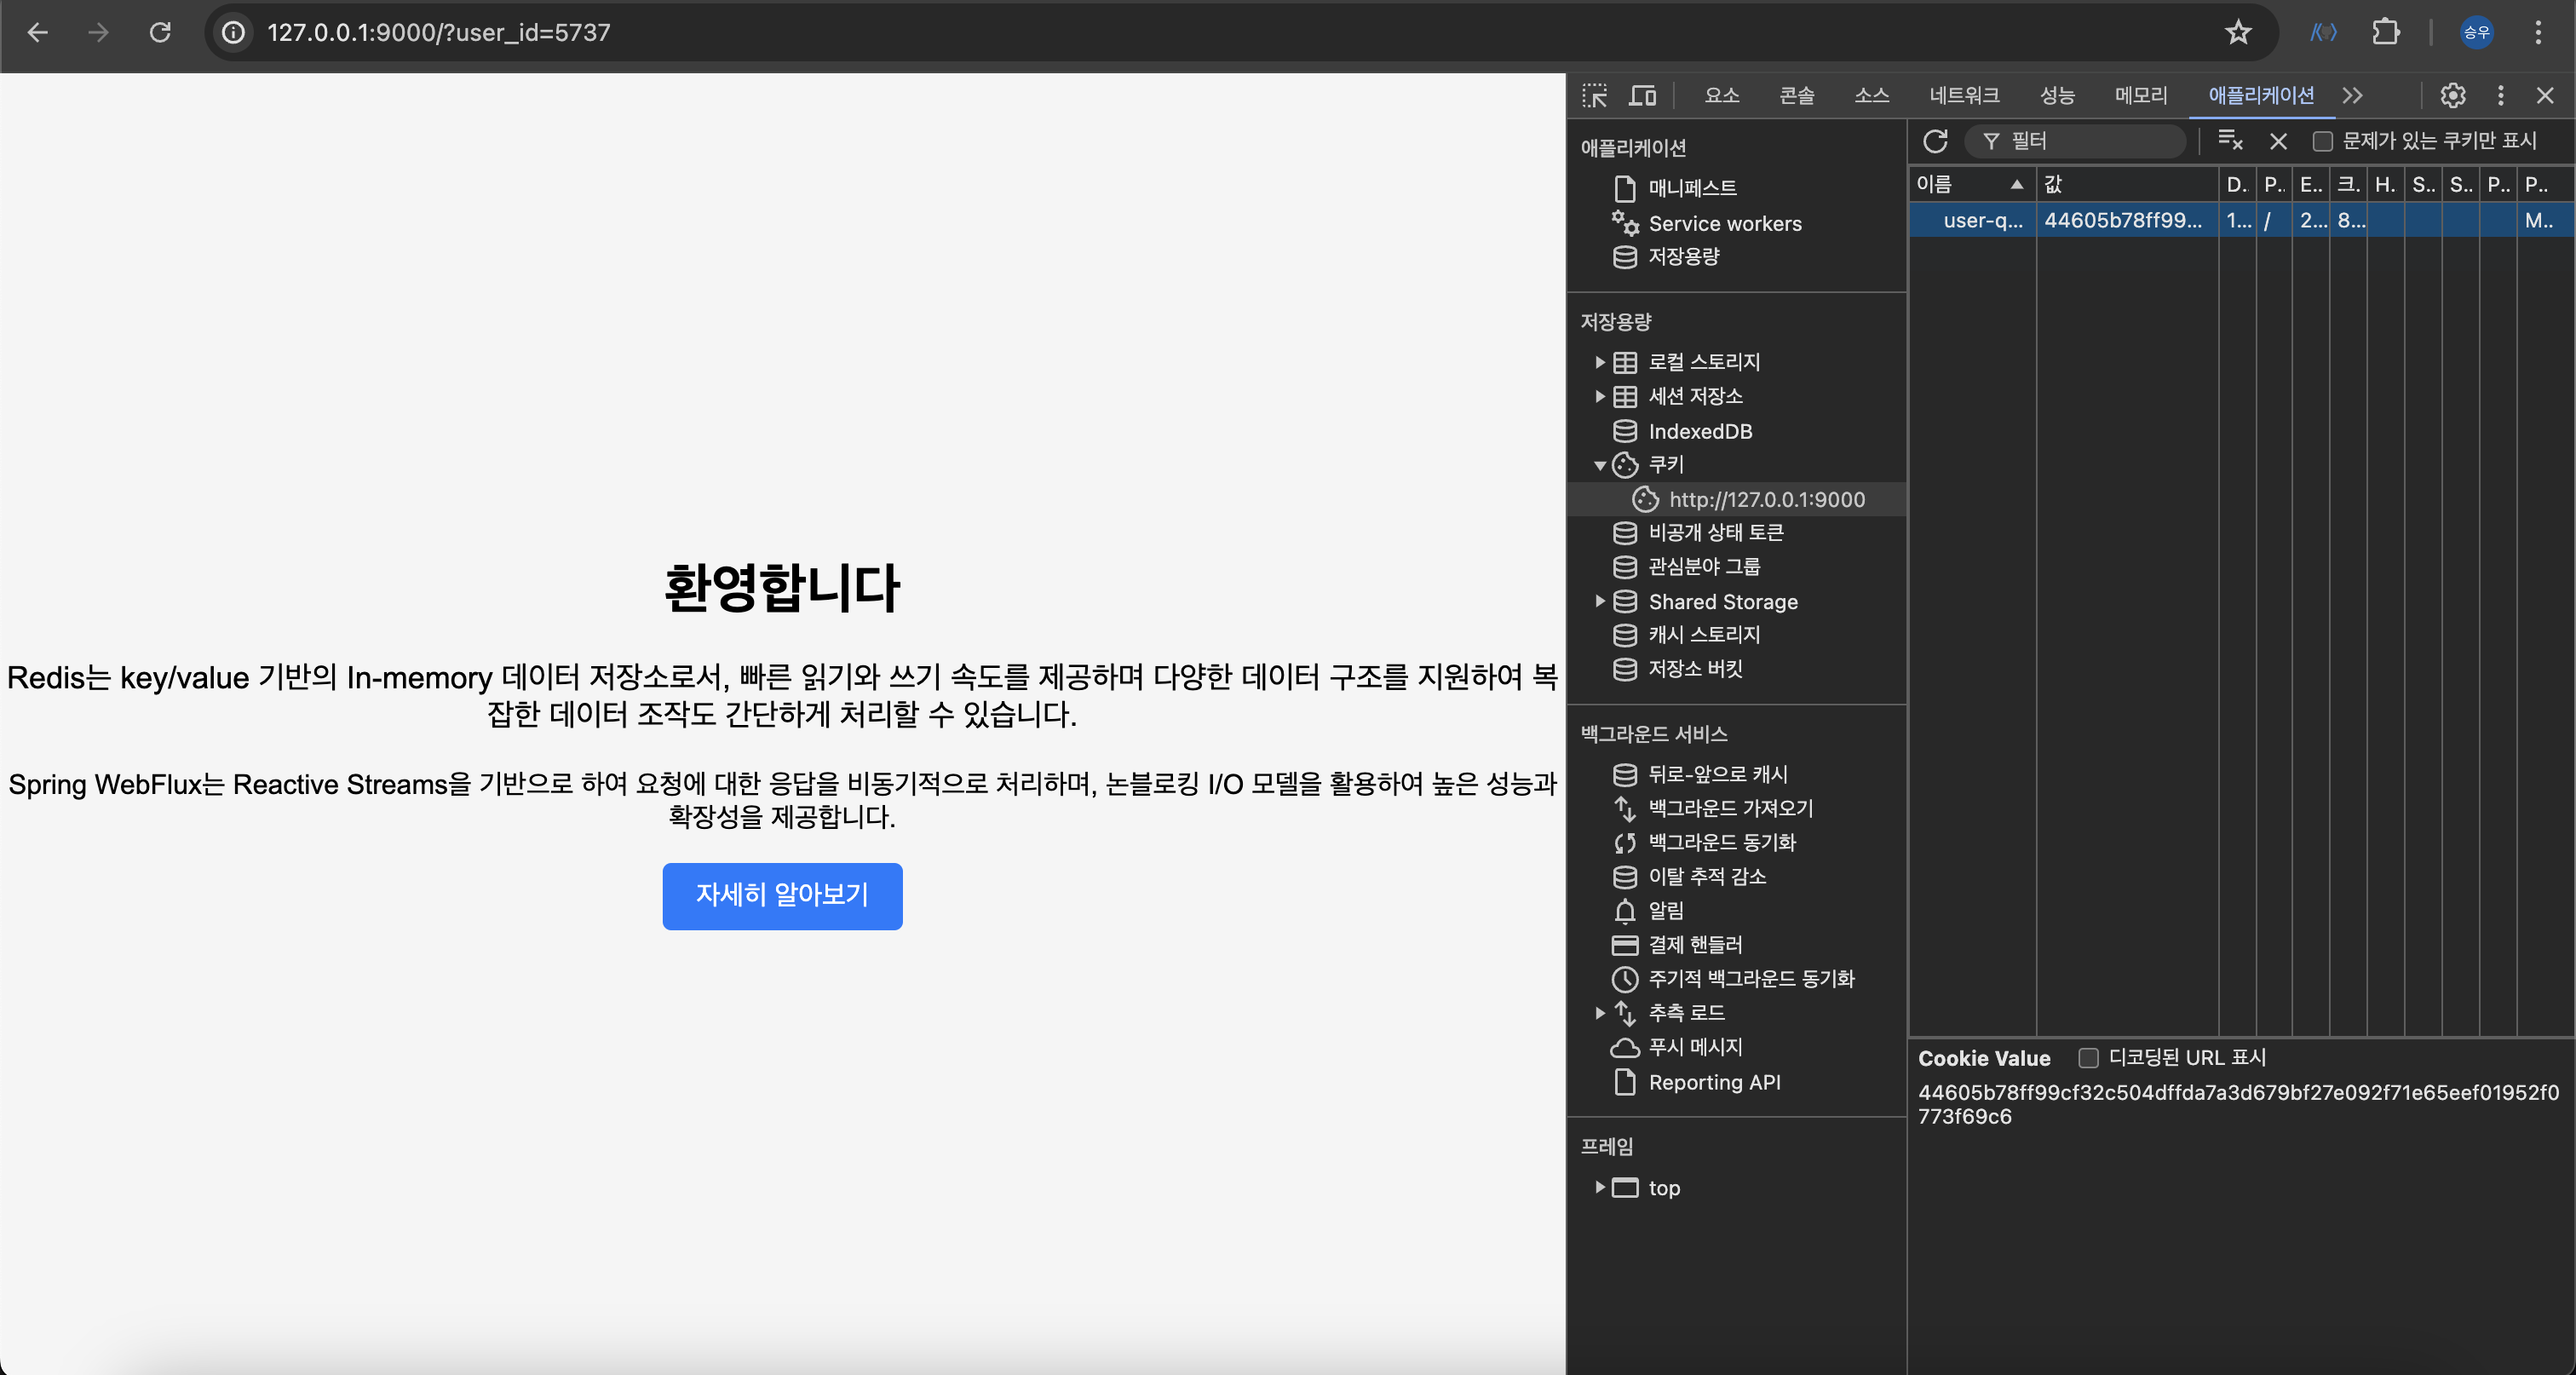
쿠키확인

- 여기서 토큰값을 지운다면 다시 waiting queue에 등록되는 흐름으로 동작한다.
이제 접속자의 입장에서 접속한다고 시나리오를 짜보자.
접속자는 당연히 처음부터 타겟페이지로 접속할것이다.
-> 이전 포스팅에서 만들어 놨던 MVC 기반의 웹페이지 프로젝트를 수정해줘야한다.
- MVC에서 Webflux로 접속가능한 상태인지 요청하기 위해서 RestTemplate을 사용한다.
@SpringBootApplication
@Controller
public class MvcwebsiteApplication {
    RestTemplate restTemplate = new RestTemplate();

    public static void main(String[] args) {
       SpringApplication.run(MvcwebsiteApplication.class, args);
    }

    @GetMapping("/")
    public String index(@RequestParam(name = "queue", defaultValue = "default") String queue,
                   @RequestParam(name = "user_id") Long userId) {
       URI uri = UriComponentsBuilder
             .fromUriString("http://127.0.0.1:9010")
             .path("/api/v1/queue/allowed")
             .queryParam("queue", queue)
             .queryParam("user_id", userId)
             .encode()
             .build()
             .toUri();
       ResponseEntity<AllowedUserResponse> response = restTemplate.getForEntity(uri, AllowedUserResponse.class);
       if(response.getBody() == null || !response.getBody().allowed()){
          // 대기 웹페이지로 리다이렉트
          return "redirect:http://127.0.0.1:9010/waiting-room?user_id=%d&redirect_url=%s".formatted(
                userId, "http://127.0.0.1:9000?user_id=%d".formatted(userId)
          );
       }
       // 허용 상태이면 해당 페이지를 진입
       return "index";
    }
    public record AllowedUserResponse(Boolean allowed){

    }
- 쿠키를 사용하기로 했으므로 다시한번 수정해주자
MVC
@GetMapping("/")
public String index(@RequestParam(name = "queue", defaultValue = "default") String queue,
                @RequestParam(name = "user_id") Long userId,
                HttpServletRequest request) {
    Cookie[] cookies = request.getCookies();
    String cookieName = "user-queue-%s-token".formatted(queue);
    String  token = "";
    if (cookies != null) {
       Optional<Cookie> cookie = Arrays.stream(cookies).filter(i -> i.getName().equalsIgnoreCase(cookieName)).findFirst();
       token = cookie.orElse(new Cookie(cookieName, "")).getValue();
    }
    URI uri = UriComponentsBuilder
          .fromUriString("http://127.0.0.1:9010")
          .path("/api/v1/queue/allowed")
          .queryParam("queue", queue)
          .queryParam("user_id", userId)
          .queryParam("token",token)
          .encode()
          .build()
          .toUri();
    ResponseEntity<AllowedUserResponse> response = restTemplate.getForEntity(uri, AllowedUserResponse.class);
    if(response.getBody() == null || !response.getBody().allowed()){
       // 대기 웹페이지로 리다이렉트
       return "redirect:http://127.0.0.1:9010/waiting-room?user_id=%d&redirect_url=%s".formatted(
             userId, "http://127.0.0.1:9000?user_id=%d".formatted(userId)
       );
    }
    // 허용 상태이면 해당 페이지를 진입
    return "index";
}
public record AllowedUserResponse(Boolean allowed){

}
Webflux
@GetMapping("/allowed")
public Mono<AllowedUserResponse> isAllowedUser(@RequestParam(name = "queue", defaultValue = "default") String queue,
                                               @RequestParam(name = "user_id") Long userId,
                                               @RequestParam(name = "token") String token){
    return userQueueService.isAllowedByToken(queue, userId, token)
            .map(AllowedUserResponse::new);
}
쿠키값 확인

Cookie는 Port와는 관계가 없다! 도메인기반으로 작동하기 때문에 같은 도메인이면 Cookie를 공유하고 활용할수 있다.
Jmeter 테스트
- Shell Script
- Jmeter
- Redis CLI
위 세가지를 가지고 성능측정을 해보겠다.
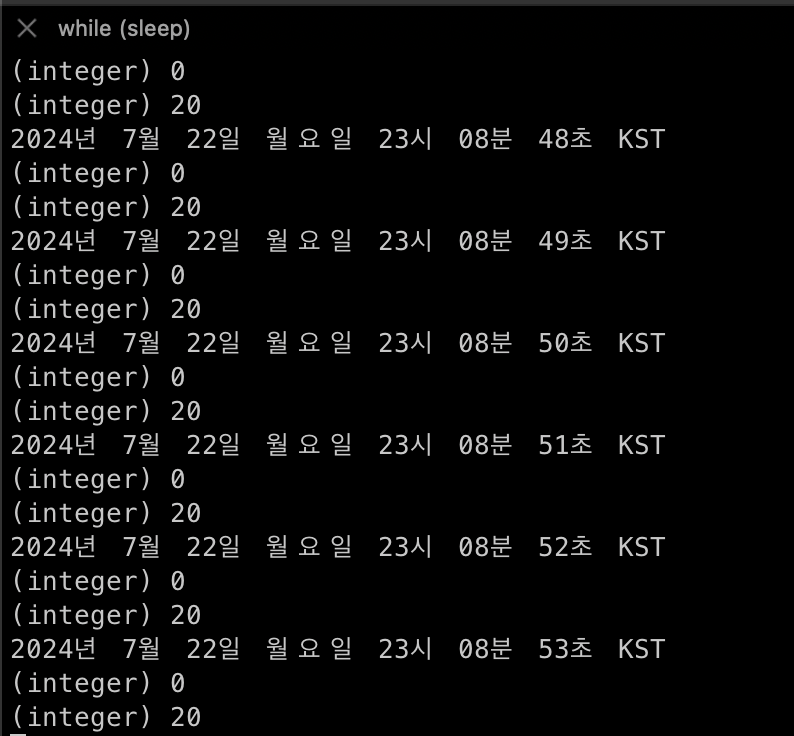
while [ true ]; do date; redis-cli zcard users:queue:default:wait; redis-cli zcard users:queue:default:proceed; sleep 1; done;
-> 반복적으로 시간을 출력하고, 사용하고 있는 Sorted Set(대기열, 실제접속) 숫자를 redis-cli에 표현하는 명령어이다.

이제 jmeter명령어로 트래픽을 흘려보자!
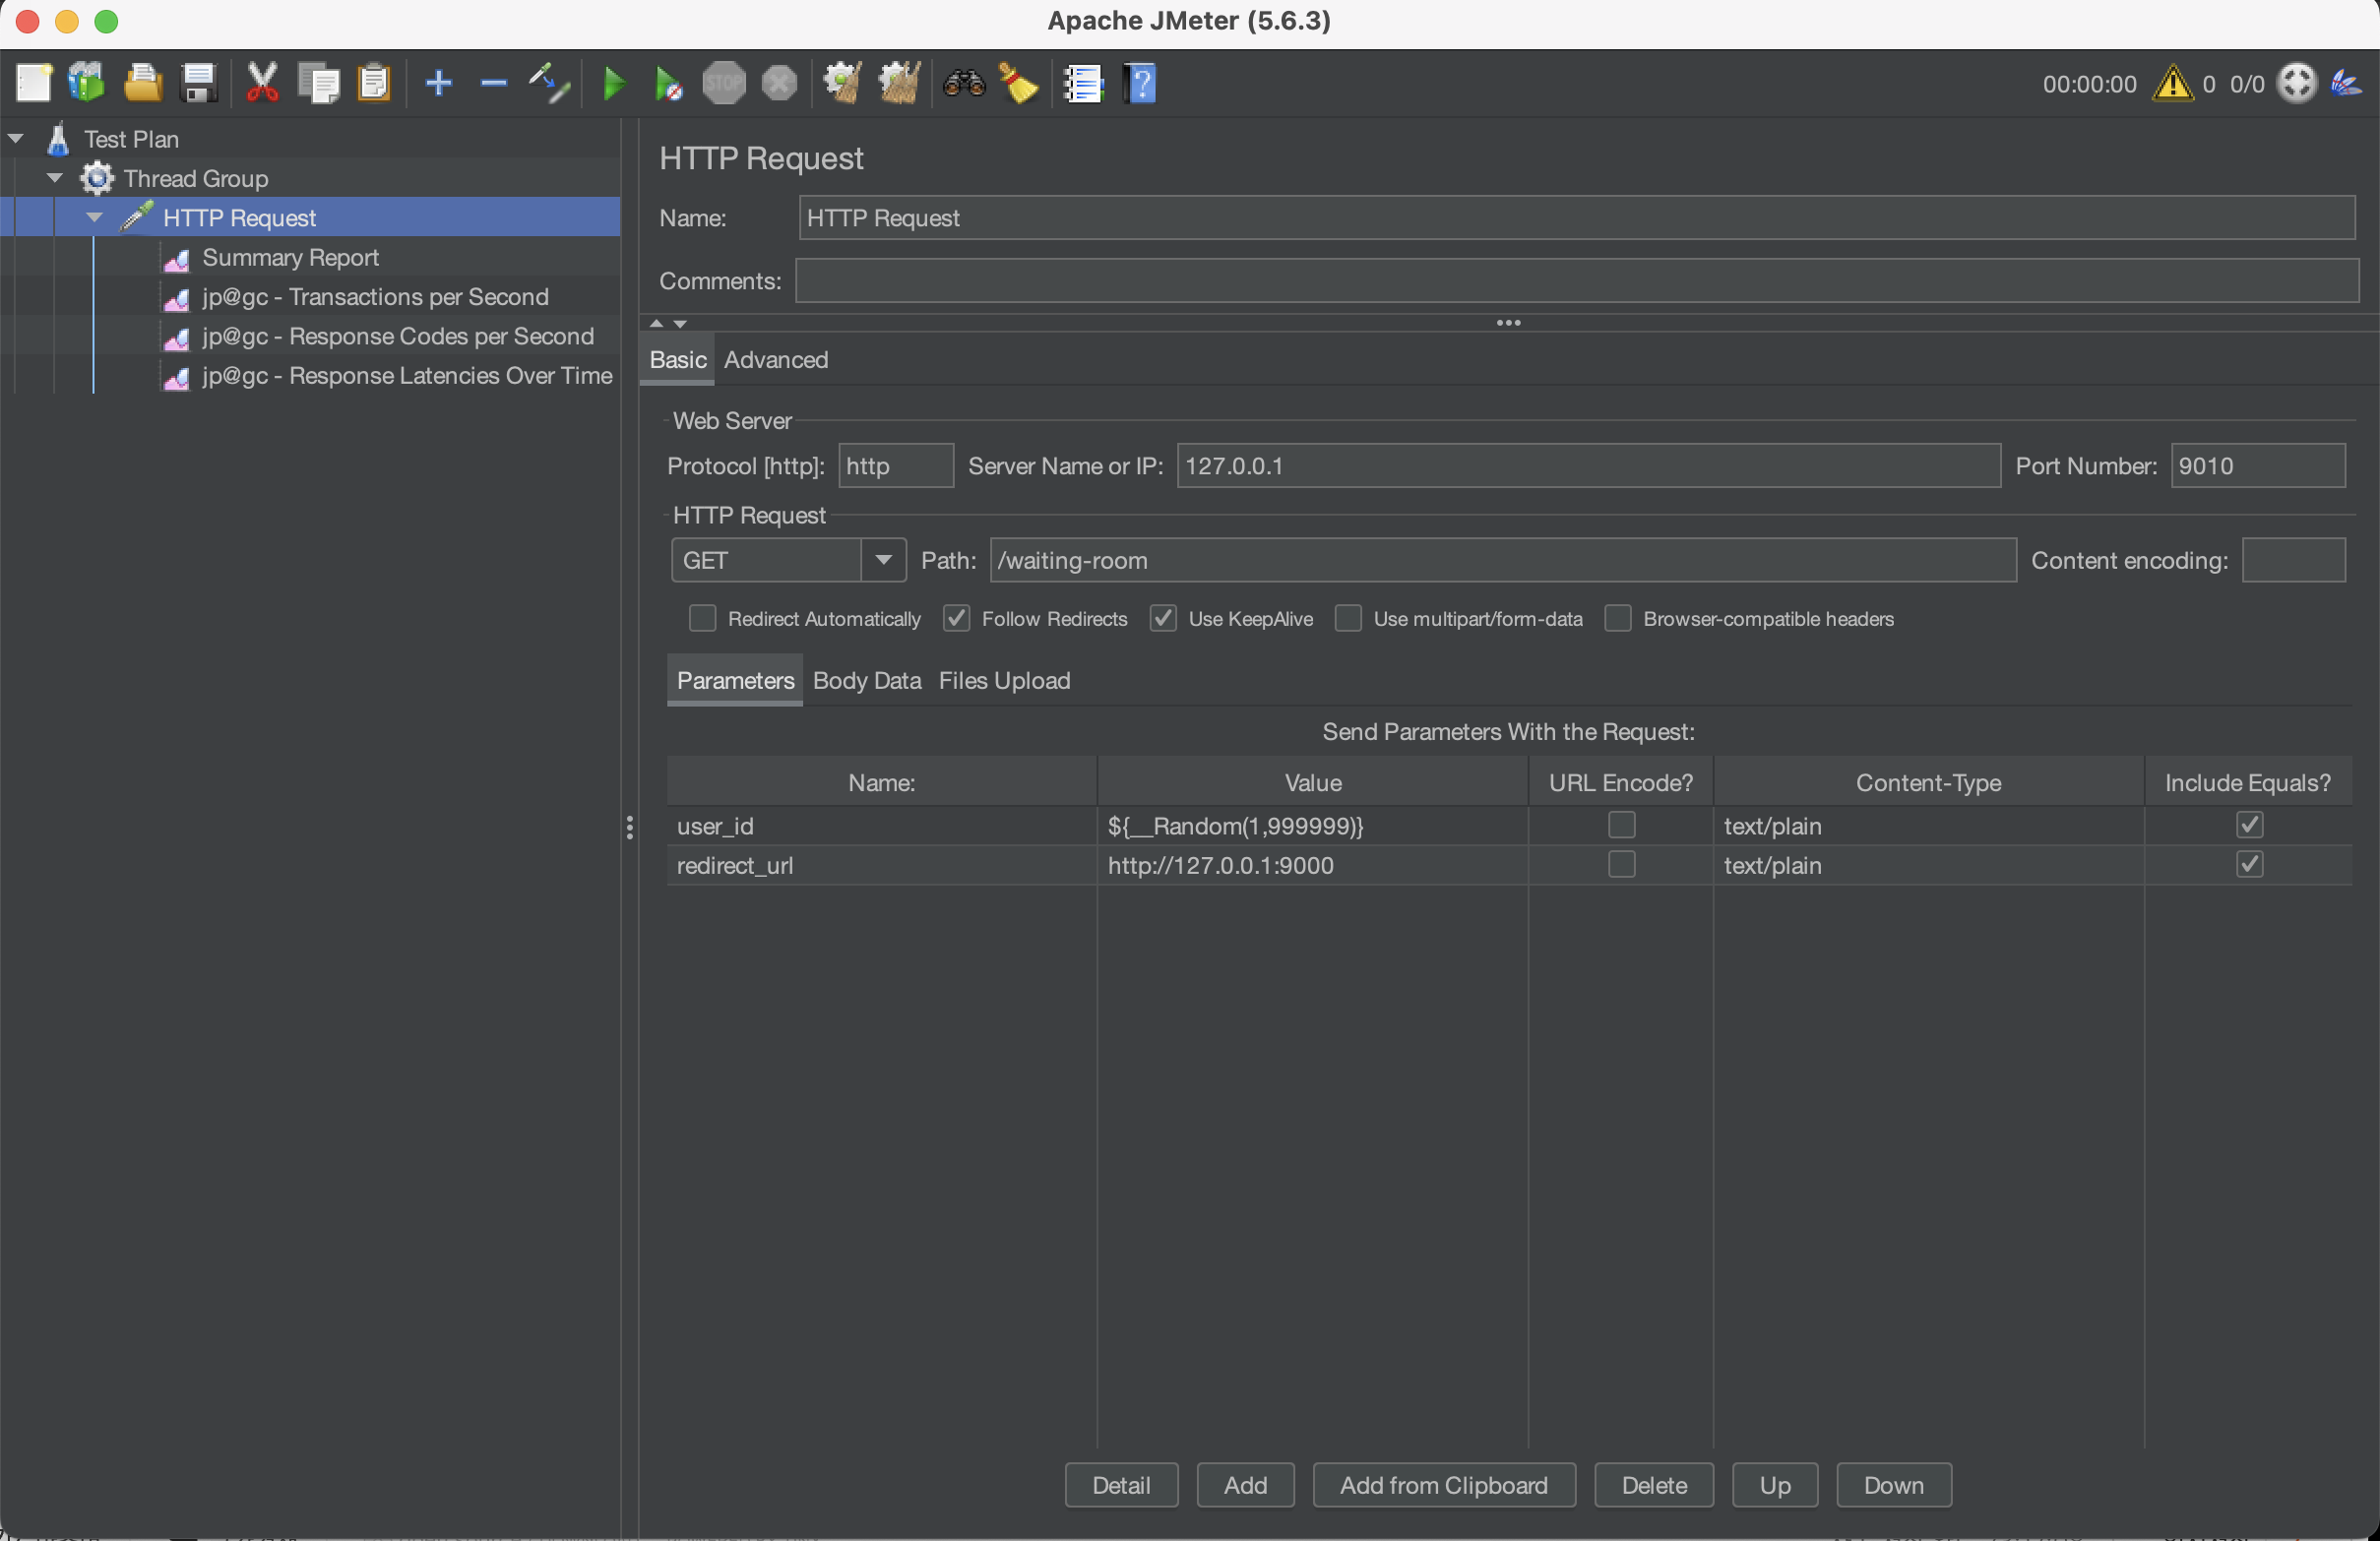
thread 그룹 세팅

30명의 사용자가 10초 동안 접속하는 시나리오로 설정해줬다.
요청 설정

사용자 아이디는 파라미터로 1 ~ 999999 값중 하나로 랜덤하게 요청하게끔 설정해주었다.
서비스단 스케쥴 코드 변경(100명씩 허용하게끔)
Long maxAllowUserCount = 100L;테스트 결과


하지만 10초에 한번씩 100명씩 proceed queue에 들어가도록 했으므로, 대기열에는 계속해서 사용자가 증가할수밖에 없다.
(수강신청처럼)
대량의 트래픽이 예상되는 경우 이와 같이 접속자 대기열 시스템을 활용하면 좋을것같다. 그럴 기회가 있으면.... 좋겠다 ~~!!
'Spring > 대용량 트래픽' 카테고리의 다른 글
| Spring Webflux와 Redis이용해서 접속자 대기열 시스템 만들기(1) (2) | 2024.07.20 |
|---|---|
| Blockhound로 디버깅하기 (0) | 2024.07.13 |
| Spring MVC vs Webflux 성능 비교(with Jmeter) (0) | 2024.07.13 |
| Reactive Redis 사용법 (1) | 2024.07.12 |
| Reactive Redis란? (0) | 2024.07.07 |