2024.07.12 - [Spring/대용량 트래픽] - Reactive Redis 사용법
Reactive Redis 사용법
2024.07.07 - [Spring/대용량 트래픽] - Reactive Redis란? Reactive Redis란?2024.07.07 - [Spring/대용량 트래픽] - Spring Webflux R2DBC 여러가지 기능들 Spring Webflux R2DBC 여러가지 기능들2024.07.06 - [Spring/대용량 트래픽]
lsdiary.tistory.com
Webflux의 R2DBC, Reactive Redis, WebClient에 대해서 살펴봤고, 비동기적으로 진행될때 속도의 이점이 어느정도인지 파악해보자.
테스트 흐름도

https://lsdiary.tistory.com/86
Spring cache abstraction, Vegeta 오픈소스 사용해보기
2024.05.08 - [Spring/대용량 트래픽] - Spring Boot Cache Spring Boot Cache2024.05.08 - [Spring/대용량 트래픽] - Redis Cache로 실습하기 Redis Cache로 실습하기2024.05.07 - [Spring/대용량 트래픽] - Redis Cache 이론 Redis Cache
lsdiary.tistory.com
성능 테스트를 위해 저번에는 Vegeta 오픈소스를 사용했었다.
Apache Jmeter
부하테스트를 위한 Java로 만들어진 오픈소스이다. 다양한 프로토콜을 지원한다는 특징이있다.
Apache JMeter - Apache JMeter™
Apache JMeter™ The Apache JMeter™ application is open source software, a 100% pure Java application designed to load test functional behavior and measure performance. It was originally designed for testing Web Applications but has since expanded to oth
jmeter.apache.org
사용하기에 앞서, 실제 처리되는 양을 확인하기위해 플러그인을 설치해야한다.

Docker에 MySQL, Redis 컨테이너를 실행시켰다. 실행과 관련된 명령어는 다음글에 있으니 참고하길 바란다.
https://lsdiary.tistory.com/82
Redis Cache로 실습하기
2024.05.07 - [Spring/대용량 트래픽] - Redis Cache 이론 Redis Cache 이론2024.05.07 - [Spring/대용량 트래픽] - Redis Key, Scan 명령어 Redis Key, Scan 명령어2024.05.07 - [Spring/대용량 트래픽] - Redis Transactions Redis Transact
lsdiary.tistory.com
MVC 프로젝트 설정
- build.gradle
implementation 'org.springframework.boot:spring-boot-starter-web'
implementation 'org.springframework.boot:spring-boot-starter-data-redis'
implementation 'org.springframework.boot:spring-boot-starter-data-jpa'
runtimeOnly 'com.mysql:mysql-connector-j'
compileOnly 'org.projectlombok:lombok'
annotationProcessor 'org.projectlombok:lombok'
testImplementation 'org.springframework.boot:spring-boot-starter-test'
testRuntimeOnly 'org.junit.platform:junit-platform-launcher'- application.yml
server:
  port: 8090
  tomcat:
    max-connections: 10000
    accept-count: 1000
    threads:
      max: 3000
      min-spare: 1000

spring:
  datasource:
    url: jdbc:mysql://localhost:3307/fastsns
    username: root
    password: ${PASSWORD}
  data:
    redis:
      host: localhost
      port: 6379
- API 코드
@SpringBootApplication
@RestController
@RequiredArgsConstructor
public class WebfluxTestApplication implements ApplicationListener<ApplicationReadyEvent> {

    private final RedisTemplate<String, String> redisTemplate;
    private final UserRepository userRepository;
    public static void main(String[] args) {
       SpringApplication.run(WebfluxTestApplication.class, args);
    }

    @GetMapping("/posts/{id}")
    public Map<String, String> getPosts(@PathVariable Long id) throws Exception {
       Thread.sleep(300);
       if(id >= 10L){
          throw new Exception("Too long");
       }
       return Map.of("id", id.toString(), "content", "Post content is %d".formatted(id));
    }

    @GetMapping("/health")
    public Map<String, String> health(){
       return Map.of("health", "ok");
    }

    @GetMapping("/users/1/cache")
    public Map<String, String> getCachedUser(){
       var name = redisTemplate.opsForValue().get("users:1:name");
       var email = redisTemplate.opsForValue().get("users:1:email");
       return Map.of("name", name == null ? "" : name, "email", email == null ? "" : email);
    }

    @GetMapping("/users/{id}")
    public User getUser(@PathVariable Long id){
       return userRepository.findById(id).orElse(new User());
    }

    @Override
    public void onApplicationEvent(ApplicationReadyEvent event) {
       redisTemplate.opsForValue().set("users:1:name", "seungwoo");
       redisTemplate.opsForValue().set("users:1:email", "seungwoo@gmail.com");
       Optional<User> user = userRepository.findById(1L);
       if(user.isEmpty()){
          userRepository.save(User.builder().name("seungwoo").email("seungwoo@gmail.com").build());
       }
    }
}

@Builder
@NoArgsConstructor
@AllArgsConstructor
@Entity
@Data
@Table(name = "users")
class User {
    @GeneratedValue(strategy = GenerationType.IDENTITY)
    @Id
    private Long id;
    private String name;
    private String email;
    private LocalDateTime createdAt;
    private LocalDateTime updatedAt;
}

interface UserRepository extends JpaRepository<User, Long> {}- 외부 요청없이 바로 응답주는 API
- Redis Cache 요청 API
- RDB 요청 API
Webflux 프로젝트 설정
- build.gradle
dependencies {
    implementation 'org.springframework.boot:spring-boot-starter-data-r2dbc'
    implementation 'org.springframework.boot:spring-boot-starter-data-redis-reactive'
    implementation 'org.springframework.boot:spring-boot-starter-webflux'
    implementation 'io.asyncer:r2dbc-mysql:1.0.2'
    compileOnly 'org.projectlombok:lombok'
    annotationProcessor 'org.projectlombok:lombok'
    testImplementation 'org.springframework.boot:spring-boot-starter-test'
    testImplementation 'io.projectreactor:reactor-test'
    testRuntimeOnly 'org.junit.platform:junit-platform-launcher'
}- application.yml
server:
  port: 9010

spring:
  r2dbc:
    url: r2dbc:mysql://localhost:3307/fastsns
    username: root
    password: ${PASSWORD}
  data:
    redis:
      port: 6379
      host: 127.0.0.1
- API 코드
@SpringBootApplication
@RestController
@RequiredArgsConstructor
public class WebfluxTest2Application {

    private final ReactiveRedisTemplate<String, String> reactiveRedisTemplate;
    private final UserRepository userRepository;
    public static void main(String[] args) {
       SpringApplication.run(WebfluxTest2Application.class, args);
    }

    @GetMapping("/health")
    public Mono<Map<String, String>> health(){
       return Mono.just(Map.of("health", "ok"));
    }

    @GetMapping("/users/1/cache")
    public Mono<Map<String, String>> getCachedUser(){
       var name = reactiveRedisTemplate.opsForValue().get("users:1:name");
       var email = reactiveRedisTemplate.opsForValue().get("users:1:email");
       return Mono.zip(name, email)
             .map(i -> Map.of("name", i.getT1(), "email", i.getT2()));
    }

    @GetMapping("/users/{id}")
    public Mono<User> getUser(@PathVariable Long id){
       return userRepository.findById(id).defaultIfEmpty(new User());
    }
}

@Builder
@NoArgsConstructor
@AllArgsConstructor
@Data
@Table(name = "users")
class User {
    @Id
    private Long id;
    private String name;
    private String email;
    private LocalDateTime createdAt;
    private LocalDateTime updatedAt;
}

interface UserRepository extends ReactiveCrudRepository<User, Long> {}
테스트 API를 간단히 작성했고, Jmeter를 설치하자. 맥 OS기준으로 터미널에서 다음과 같이 입력한다.
brew install jmeter설치후 다음 명령어로 jmeter를 실행시킨다.
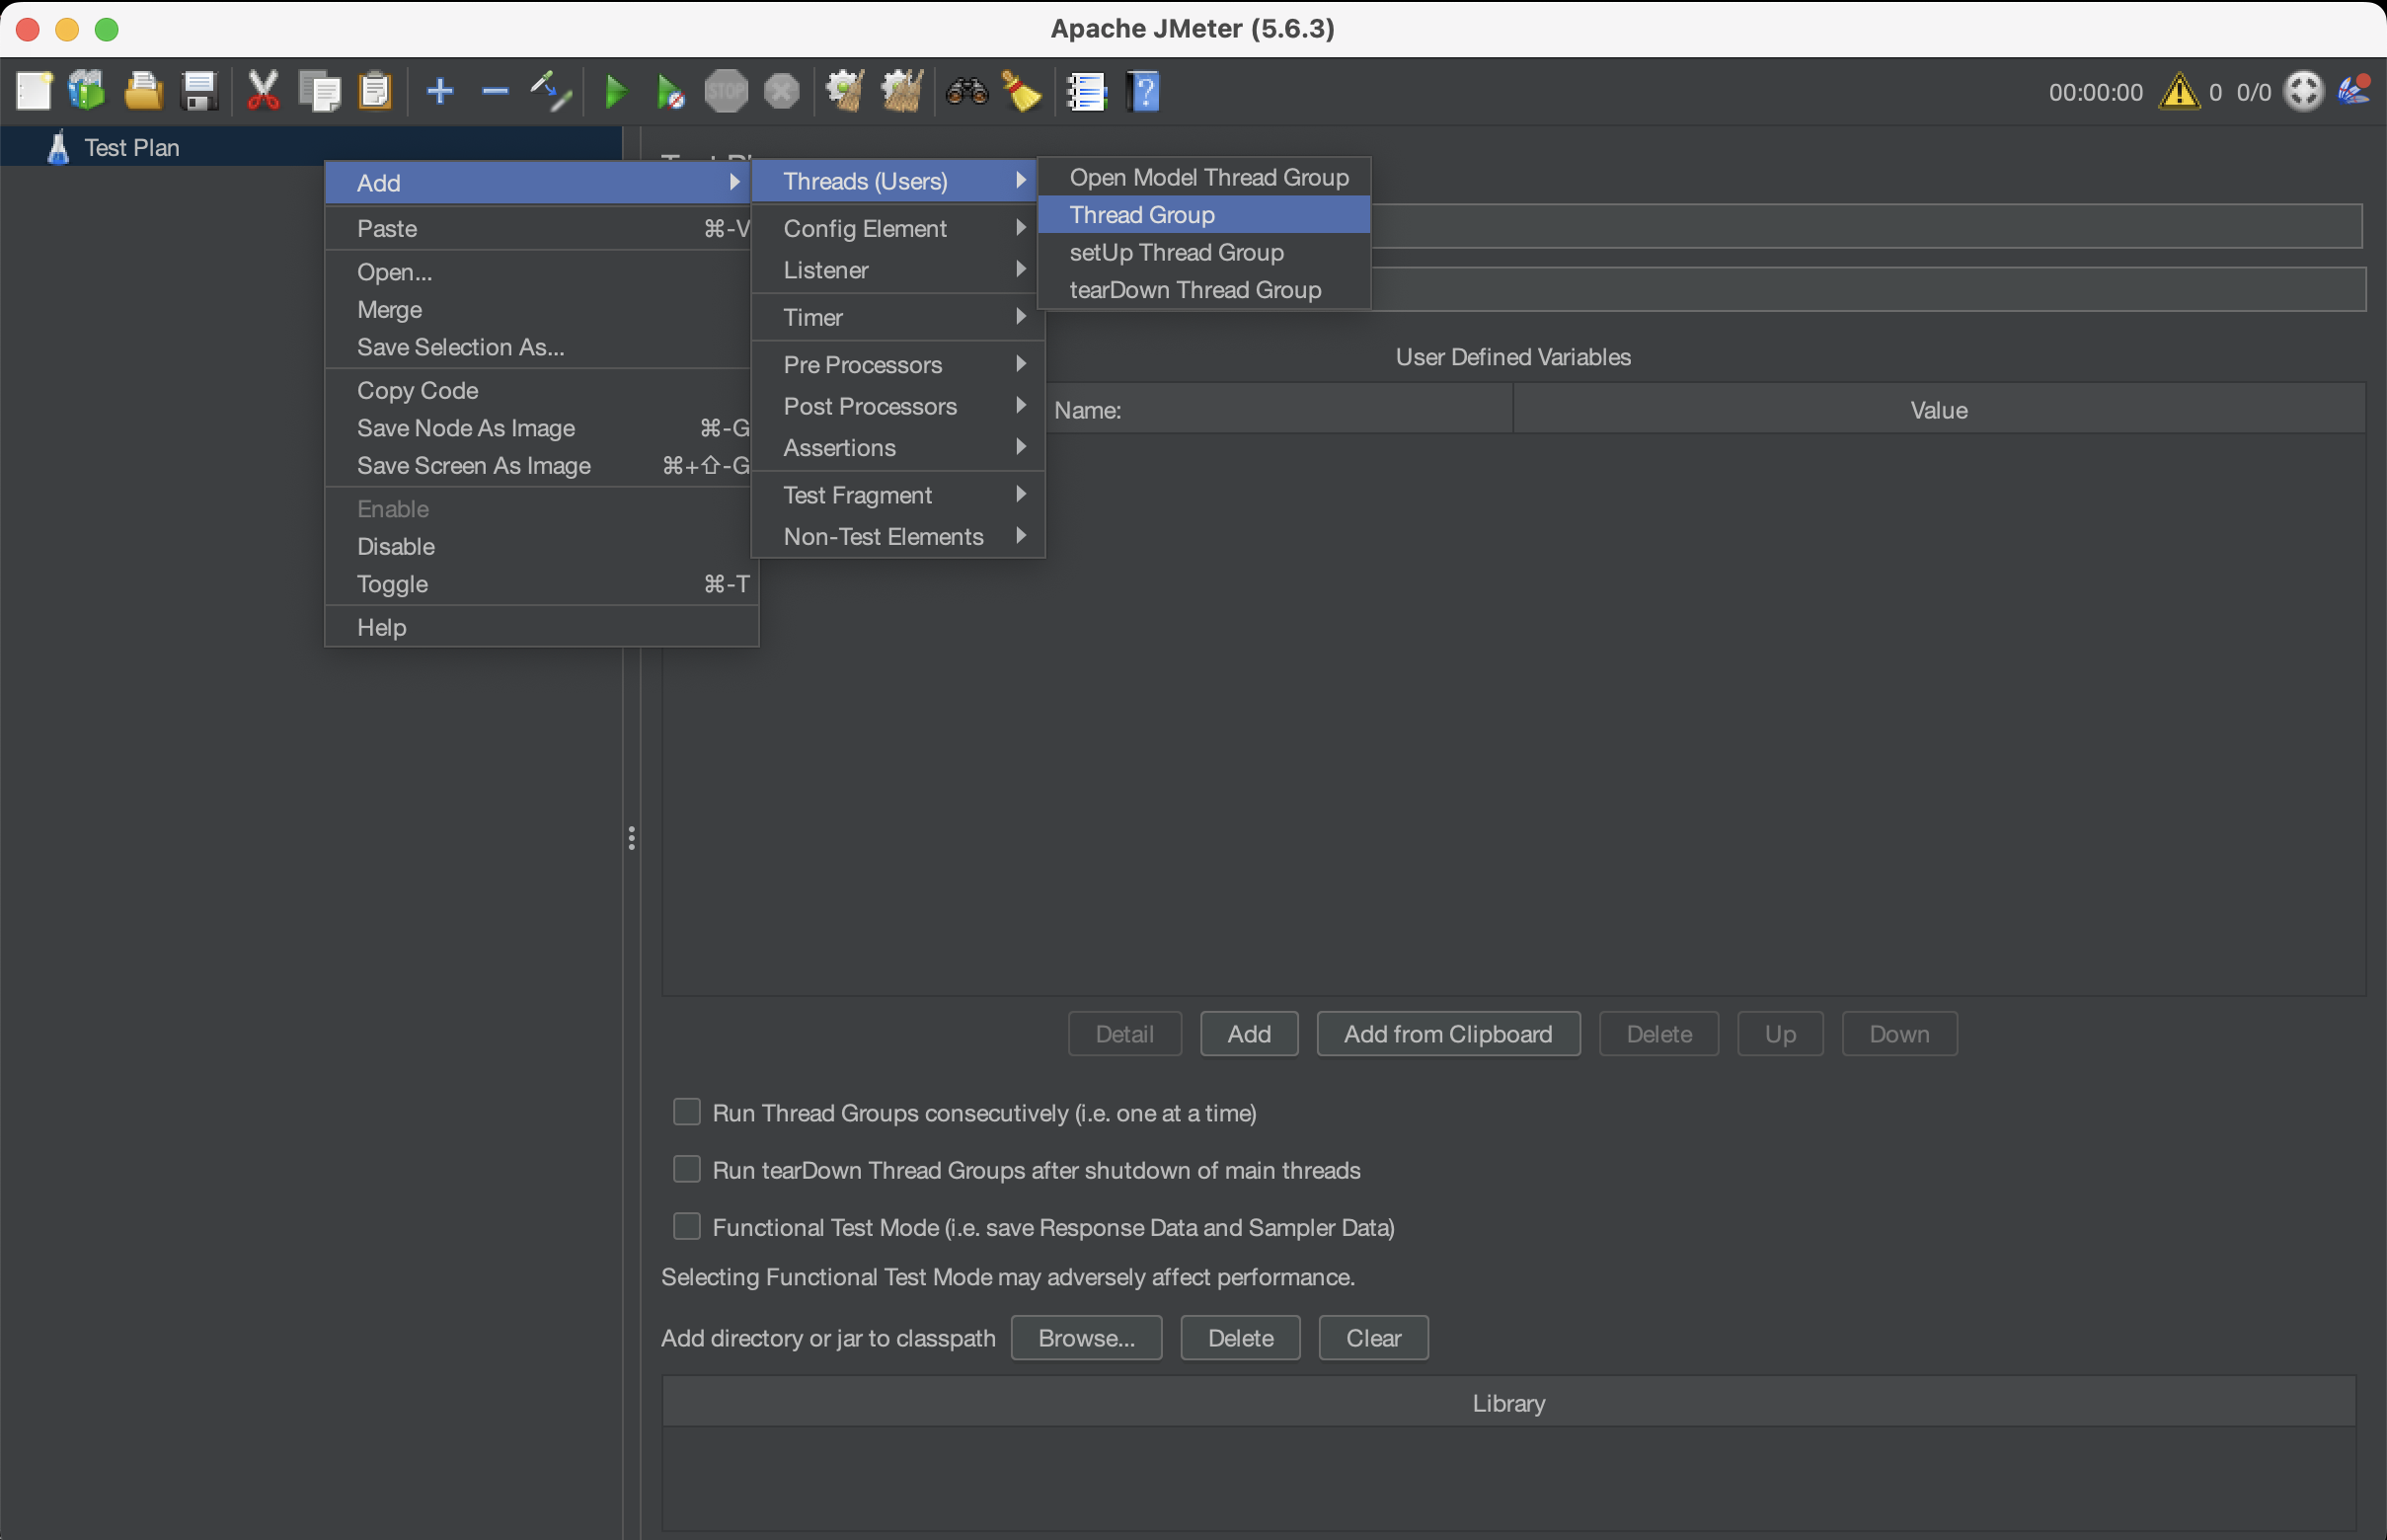
jmeter다음과 같은 창이 뜨게 되는데 스레드 그룹을 만들수있다.


- Number of Threads (users) : 스레드수(동시 사용자 요청 수)
- Ramp-up period (seconds) : 모두요청할때까지 준비시간
- Loop Count : 설정할 요청을 몇번 반복?
요청 설정

결과 설정
어떤 요청을 보내서 테스트할지 결정했지만, 결과를 보는 것에 대해서는 설정하지않았다.


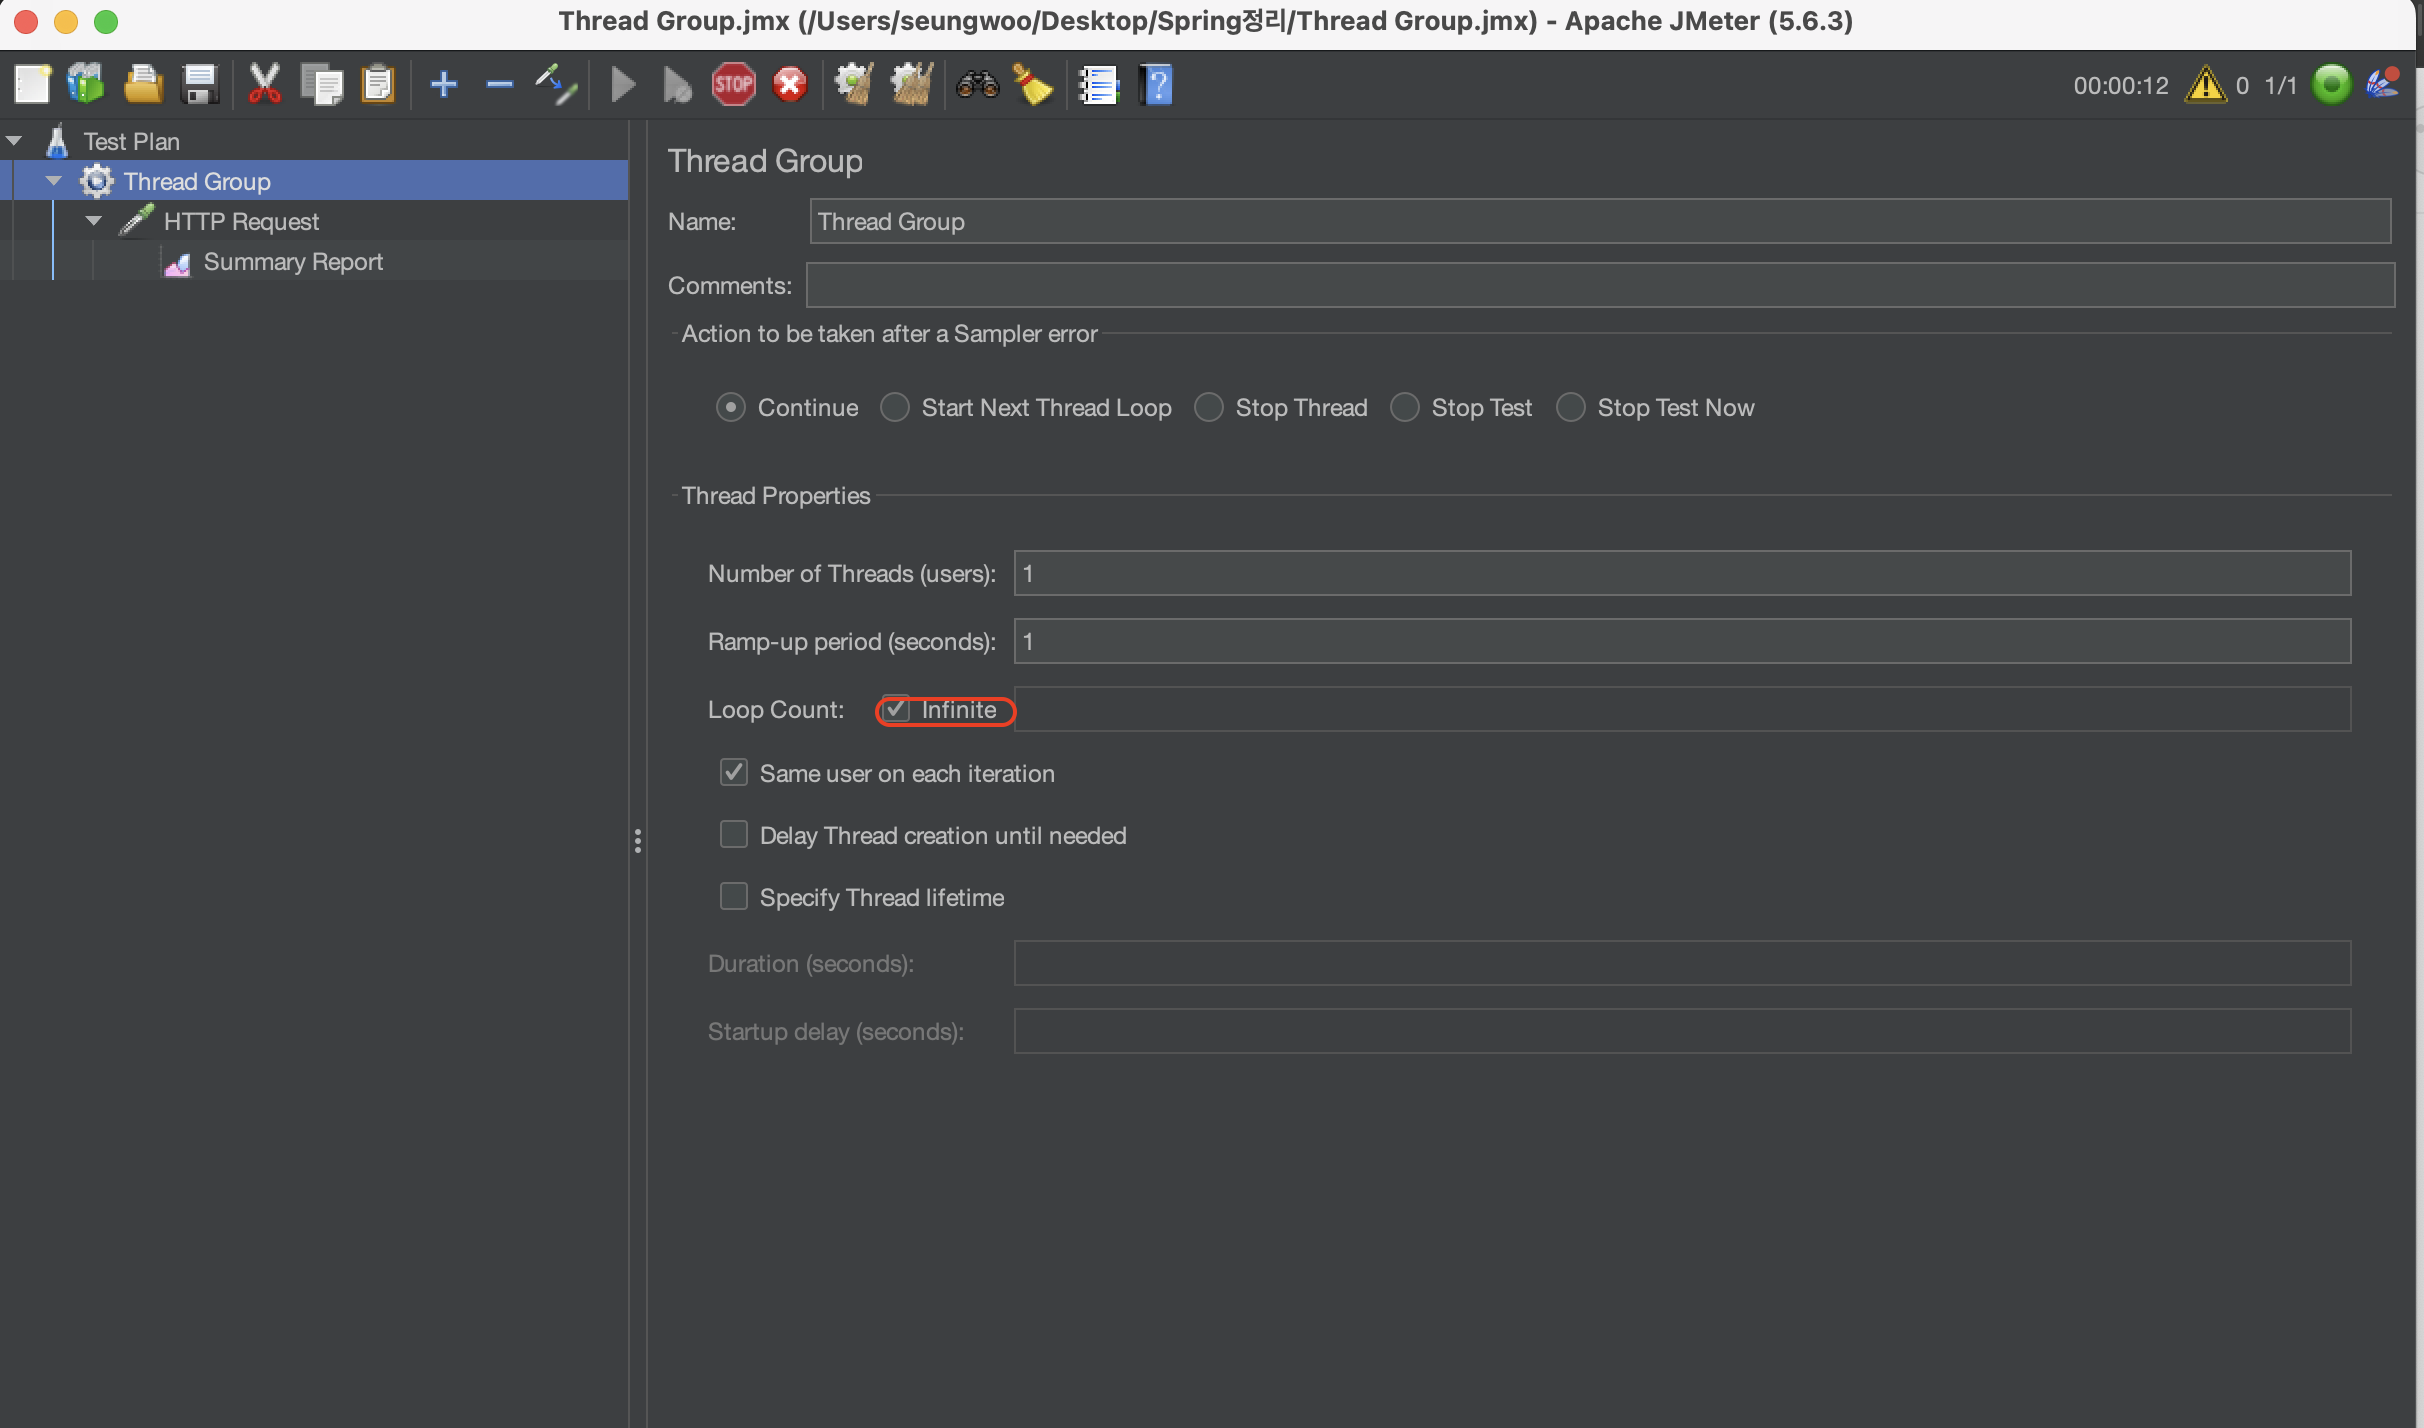
설정한 요청반복을 무한대로 설정하고, 테스트를 실행해보면

이와같이 여러 결과값을 관측할수 있다.
플러그인 다운로드
더욱 자세한 결과를 확인하기위해서는 추가적인 플러그인이 필요하다.

가장 오른쪽위에 위와같이 빨간색으로 표시한 부분을 클릭한다.

위와 같이 플러그인을 다운한다. (+ 바로위에 3 Basic Graphs도 같이 다운 받자!!)
다운로드가 끝나면 자동으로 재실행되고, 결과값을 받을 리스너를 들어가보면 아래와 같이 볼수있는 형태가 매우 다양해진것을 확인할수 있다.

리스너 세팅

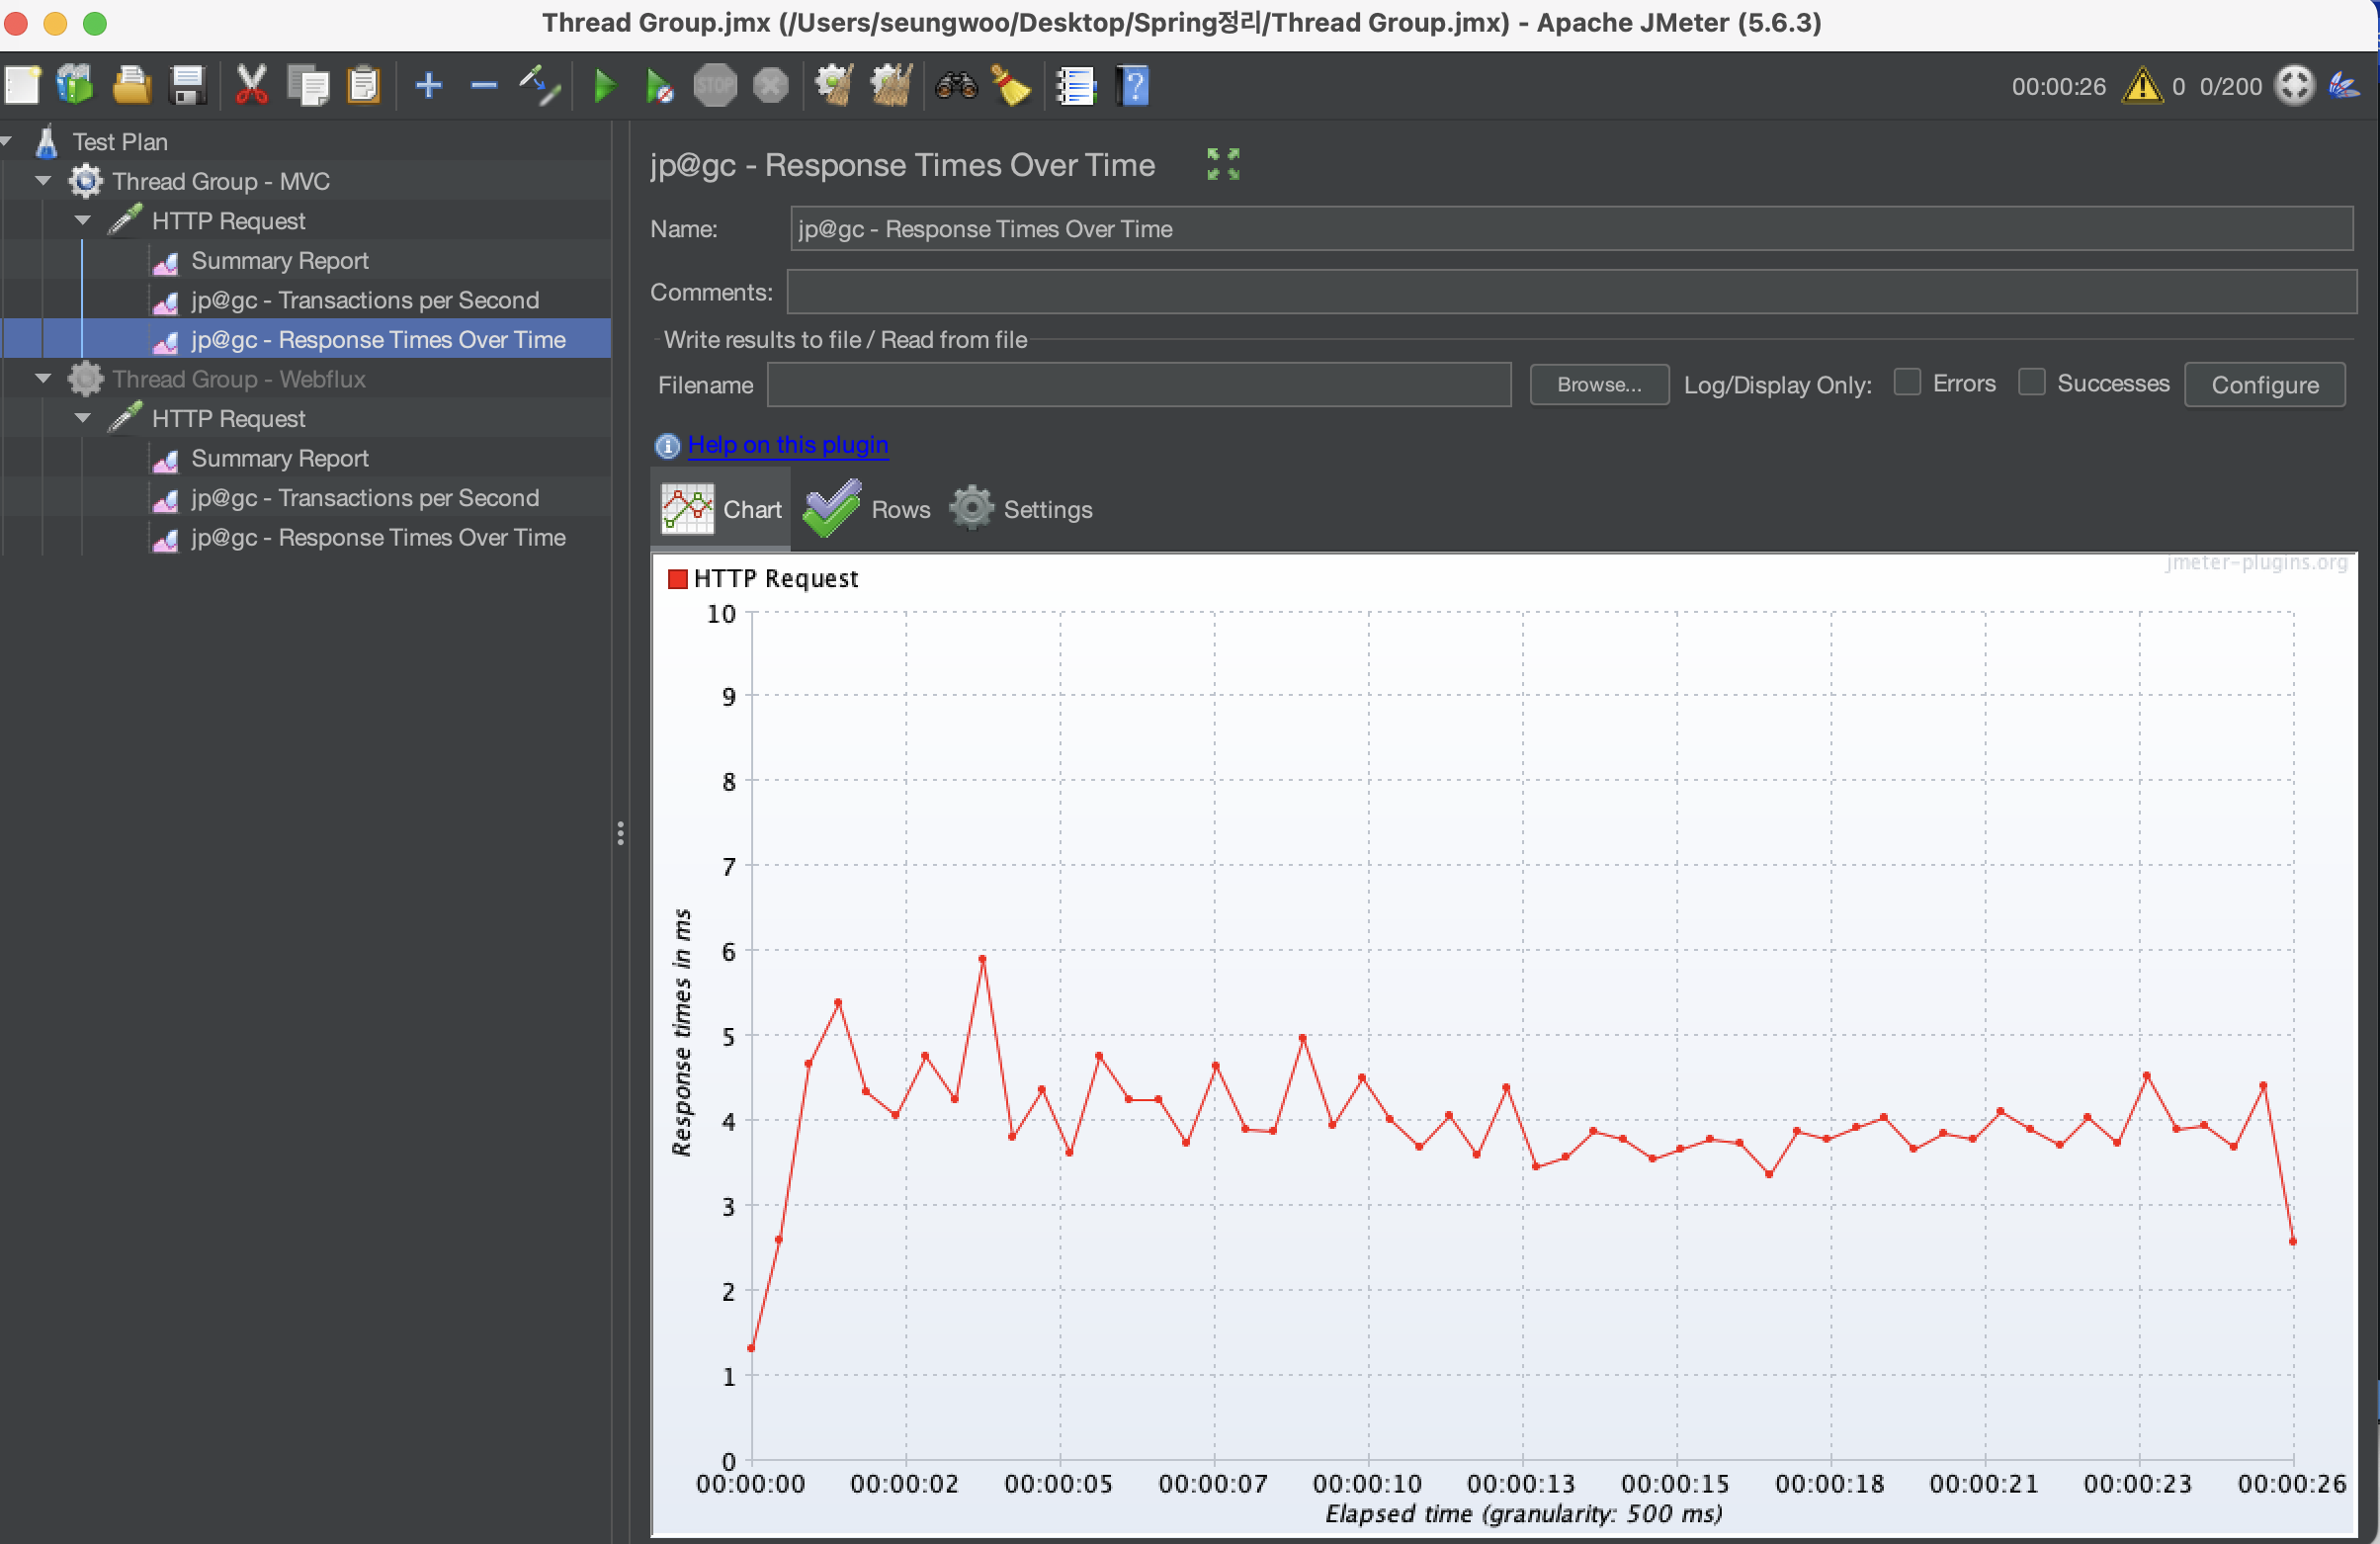
- TPS가 얼마나 되는지?
- 응답시간이 얼마나 걸리는지?
에 대해서 그래프로 보여준다.
이제 테스트를 진행할것인데, 그 전에 각각 따로 실행해서 정확한 결과값을 얻기 위해 안쓰는 Thread Group은 Disable해두자!

MVC 테스트(/health경로) - 기본응답
나는 스레드개수(동시 트래픽)을 200으로 설정하고 테스트 할것이다.


Webflux 테스트(/health 경로) - 기본응답


단순 요청에 대해서도 벌써부터 Webflux의 성능이 좋은것을 확인할수 있다.
docker stats [컨테이너 ID], [컨테이너 ID], ...
터미널에서 각 컨테이너의 상태를 파악하기 위해 stats명령어로 cli에서 상태확인을 할수있다.

MVC 테스트 (/users/1 경로) - DB에 질의

(캡처본이 너무 많아져서 이제 스크린샷은 그만찍고 결과만 나열하도록 하겠다...)
- 총 처리량 : 4300
- TPS : 4400
- 응답시간 : 48ms
Webflux 테스트 (/users/1 경로) - DB에 질의
- 총 처리량 : 14400
- TPS : 14000
- 응답시간 : 14ms
** 더 큰 성능차이를 확실하게 확인할수 있다.
MVC 테스트 (/users/1/cache 경로) - Redis에 질의
- 총 처리량 : 12700
- TPS : 12500
- 응답시간 : 16ms
Webflux 테스트 (/users/1/cache 경로) - Redis에 질의
- 총 처리량 : 33500
- TPS : 33000
- 응답시간 : 6ms
위와 같은 테스트를 통해 성능차이가 엄청 크다는 것을 직접 체험할수 있었다.
다수의 트래픽이 몰리는 API를 만들때는 Webflux를 적극활용해야한다!!
2024.07.13 - [Spring/대용량 트래픽] - Blockhound로 디버깅하기
Blockhound로 디버깅하기
2024.07.13 - [Spring/대용량 트래픽] - Spring MVC vs Webflux 성능 비교(with Jmeter) Spring MVC vs Webflux 성능 비교(with Jmeter)2024.07.12 - [Spring/대용량 트래픽] - Reactive Redis 사용법 Reactive Redis 사용법2024.07.07 - [Spring
lsdiary.tistory.com
'Spring > 대용량 트래픽' 카테고리의 다른 글
| Spring Webflux와 Redis이용해서 접속자 대기열 시스템 만들기(1) (2) | 2024.07.20 |
|---|---|
| Blockhound로 디버깅하기 (0) | 2024.07.13 |
| Reactive Redis 사용법 (1) | 2024.07.12 |
| Reactive Redis란? (0) | 2024.07.07 |
| Spring Webflux R2DBC 여러가지 기능들 (0) | 2024.07.07 |